What Does a Wood Stove Inspection Check?
A building inspector will arrive, spend 20–40 minutes at your installation, and either sign off or issue a correction notice. Here is exactly what they look at — so you can pass the first time.
Most wood stove inspections take under 30 minutes. The inspector works through a mental checklist that is almost identical across jurisdictions — because the underlying codes (IRC and NFPA 211) are the same. Knowing what's on that checklist before your inspection day is the difference between a sign-off and a correction notice.
Run through this list yourself before calling for inspection. Inspectors issue correction notices for small items that take minutes to fix — reversed stovepipe joints, an undersized hearth pad, a missing CO detector. A self-check catches these before the inspector does.
The Complete Wood Stove Inspection Checklist
1. Permit Paperwork
The inspector starts by verifying the permit is valid and the installation matches what was approved. They will check:
- The permit is posted or available on-site (some jurisdictions require posting; others just need you to have it)
- The stove model matches what was listed on the permit application
- The installation location matches the approved site plan or sketch
If you changed the stove model after applying, notify your building department before the inspection — an unapproved substitution can invalidate the permit entirely.
2. EPA Certification Label
This is always one of the first physical checks. The inspector looks at the back or underside of the stove for the EPA certification label. They confirm:
- The EPA certification label is physically present on the appliance
- The label is legible (not painted over, worn off, or removed)
- The label shows Phase 2 certification (or the applicable current standard)
- The certification number matches the stove make and model
A missing or illegible EPA label is an automatic fail in nearly every jurisdiction. If you've repainted or refinished the stove, check the label area carefully before scheduling inspection. See the EPA Certification Guide for how to handle a missing label.
3. Wall and Ceiling Clearances
The inspector measures the actual distance from the stove body to every nearby combustible surface. They will:
- Measure clearance to the back wall
- Measure clearance to each side wall (both sides independently)
- Measure clearance to the ceiling above the stove body
- Verify these measurements against the stove's certification label clearances
- If heat shields are installed, verify the shield construction and air gap method qualify for the reduction claimed
- Verify the shield air gap is open at top and bottom (not sealed)
Use the Clearance Calculator to verify your distances before the inspector arrives. The most common failure: the homeowner measured from the stove's decorative trim or surround rather than from the stove body itself, leaving the actual body too close to the wall.
4. Hearth Pad (Floor Protection)
The hearth pad check involves both material verification and dimensional measurement:
- Hearth pad material is non-combustible (stone, brick, listed hearth pad, ceramic tile on non-combustible substrate)
- Hearth pad extends the correct distance in front of the firebox opening (16 in. for openings under 6 sq ft; 20 in. for larger)
- Hearth pad extends at least 8 in. to each side of the firebox opening and behind the stove
- Hearth pad thickness is adequate for the material type
- No combustible material is visible or accessible beneath the hearth pad at the stove perimeter
The inspector measures from the firebox opening edge, not from the stove body's front face. If your stove has a large body that extends beyond the firebox door, your hearth pad may need to be larger than you think. See the Hearth Pad Guide for detailed sizing and material guidance.
5. Stovepipe Condition and Connections
The stovepipe run from the stove collar to the chimney thimble gets a detailed review:
- All joints are overlapping correctly — crimped (male) end faces down toward the stove, smooth (female) end faces up toward the chimney
- All joints are secured (sheet metal screws — minimum 3 per joint is the NFPA 211 standard)
- Single-wall stovepipe clearance from combustible walls and ceiling is maintained at 18 in. minimum
- No single-wall stovepipe passes through a wall, ceiling, floor, or into an attic space
- Horizontal stovepipe sections are pitched upward toward the chimney (minimum ¼ in. per foot)
- Total horizontal run does not exceed 75% of the vertical chimney height
- Connection at the stove collar is tight and properly seated
- Connection at the thimble or chimney connector is secure
Reversed joints are the single most commonly cited stovepipe violation. The crimped end always goes down — into the section below — so that creosote condensate drains back into the stove, not out of the joint onto the floor.
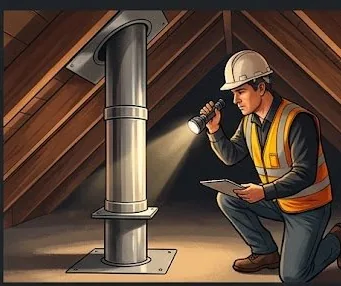
6. Chimney System
The chimney inspection is the most thorough part of the visit, because chimney failures cause house fires:
- Class A chimney pipe (all-fuel, listed UL 103 HT) is used for all sections passing through ceilings, walls, or attic spaces — no single-wall stovepipe in these areas
- Chimney is the correct size (diameter) for the stove's flue collar
- All chimney sections are from the same listed system (mixing brands voids the listing in most cases)
- 2-inch minimum clearance maintained between chimney and all combustible framing members through the ceiling and attic
- A listed ceiling support box or thimble is installed where the chimney transitions from stovepipe to Class A at the ceiling
- Chimney is properly supported at required intervals (per manufacturer instructions, typically every 6–8 feet)
- Chimney extends at least 3 feet above the roof penetration point
- Chimney extends at least 2 feet above any part of the structure within 10 horizontal feet
- Chimney cap or rain cover is installed (required in most jurisdictions; strongly recommended by all)
- For masonry chimneys: liner is present, intact, and properly sized for the stove being connected
- For inserts: a full-length liner is run from the insert collar to the chimney top
Mixing chimney brands is a common and costly mistake. Class A chimney systems are listed as complete systems. Using one brand's inner pipe with another brand's outer pipe or support hardware voids the UL listing. Inspectors who recognize this will fail the installation. Buy your chimney system from one manufacturer and use their components throughout.
7. Carbon Monoxide and Smoke Detectors
Nearly all jurisdictions now require CO and smoke detection as part of the solid fuel appliance permit. The inspector checks:
- A functioning carbon monoxide detector is installed on the same floor as the wood stove
- CO detector is within 10 feet of each sleeping area on that floor (IRC R315)
- A functioning smoke detector is installed in the room containing the stove (if not already present)
- Smoke detectors are present in all required locations per IRC R314 (each sleeping room, outside each sleeping area, each floor level)
- Both detectors are powered (battery or hardwired, depending on jurisdiction and home age)
This is the easiest category to pass — and the most embarrassing one to fail. Put fresh batteries in all detectors the day before your inspection.
8. Insert-Specific Checks (If Applicable)
If you've installed a fireplace insert rather than a freestanding stove, the inspector adds these checks:
- A full-length chimney liner runs from the insert collar to the top of the chimney (not just to the smoke chamber)
- The liner diameter matches the insert's outlet size
- The liner is secured at the top with a listed cap and top plate
- The surround panel (trim panel covering the fireplace opening) is properly seated and non-combustible
- The insert is fully inserted into the fireplace opening with no unsealed gaps
What Happens If You Fail Inspection
A failed inspection results in a correction notice listing each deficiency. You will need to:
- Correct every item on the notice
- Call or go online to schedule a re-inspection
- Pay a re-inspection fee in most jurisdictions (typically $50–$100)
You do not need to restart the permit process — the existing permit remains valid during the correction window, which is typically 90–180 days. Most corrections are minor: repositioning a stove 2 inches, adding screw fasteners to pipe joints, or extending a hearth pad. Do not use the stove until the inspection is passed and signed off.
What to Have Ready for the Inspector
Recommended Tool: Digital Wood Moisture Meter
Burning wet wood is the single biggest driver of creosote buildup and chimney fires. A moisture meter takes 10 seconds per log and tells you definitively whether your firewood is ready to burn. Target: under 20% moisture content. Inspectors and CSIA chimney sweeps recommend testing every cord you receive.
Check Price on Amazon →As an Amazon Associate, WoodStoveCode earns from qualifying purchases. Price and availability may vary.
Make the inspector's job easy and your inspection fast:
- The issued permit (and permit number, if they ask)
- The stove's installation manual (some inspectors want to reference it)
- The stove's certification label location — know where it is so you don't have to search
- Clearance measurements written down (back wall, side walls, ceiling, hearth extension) — showing you've already measured builds confidence
- Access to the attic or ceiling space where the chimney passes through, if applicable
- A stepladder if the inspector needs to access the chimney connection area
Inspection Day Checklist — Free Printable PDF
A printable pre-inspection self-check form. Run through every item above before you call for your inspection appointment.
Download Free PDFFrequently Asked Questions — Inspections
No — do not operate the stove before the inspection is passed. Using an unpermitted, uninspected solid fuel appliance can void your homeowner's insurance coverage for any related loss. It also creates a legal issue if anything goes wrong. The inspection process exists precisely to catch installation errors before they cause a fire.
Yes, in almost all jurisdictions. The inspector needs access to the interior of the home, the attic (if applicable), and the roof area around the chimney. You or an authorized adult representative must be present. If you hired a contractor, they can often be the point of contact for the inspection if they're present — confirm this with your building department.
Most residential wood stove inspections take 20–40 minutes. The inspector will walk through the installation methodically. More complex installs — inserts, masonry chimney relining, basement installations — may take longer. Having everything ready (permit, access, clearance notes) can reduce the time significantly.
You have the right to appeal a building inspection decision in all jurisdictions. The process typically involves filing a written appeal with the local Board of Appeals within a specified window (often 30 days). However, most correction notices cite genuine code requirements, and it is faster and cheaper to correct the installation than to appeal. If you believe a correction is in error, ask the inspector to cite the specific code section they're applying — then look it up. Most building departments have a chief inspector you can consult as a first step before a formal appeal.
Mostly the same, with a few differences. Pellet stoves require a combustion air supply (outside air intake) in tightly sealed homes, which the inspector will verify. Pellet stoves also use smaller-diameter flue pipes and in some cases can use direct-vent horizontal terminations rather than a full vertical chimney — but this depends entirely on the stove's listing and local code. The EPA certification check, clearances, hearth pad, CO detector, and permit verification apply equally to both fuel types.
Next Steps
How to Pull a Permit
Step-by-step guide to the permit application process before your installation.
Read → Code GuideClearance Requirements
Full chart of wall, floor, and ceiling clearances — with and without heat shields.
Read → Free ToolClearance Calculator
Enter your stove's rated clearance and shield type — get all required distances instantly.
Open →